Saturday, November 28, 2009

Harvesting...Finally!

We've certainly had a strange year.  We had plenty of rain, and plenty of cool weather.  I've heard several different farmers (in different areas of the midwest) say that it's been the worst growing season they can remember.  This fall's rain has made it tough for the farmers to pick their corn and combine their beans.  I was beginning to think that the field behind my yard wasn't going to get picked until we had a hard frost.  There's just so much moisture in the corn, it would take a hard freeze to dry it out.  Here's how it looked mid-day yesterday.


A few hours later, I thought I heard some rumbling sounds coming from the other end of the field.  Sure enough, there was not one, not two, but three combines out picking the corn.  By the time I could grab my camera and run to the back of my yard, two of them had already made their first pass.


I hung around and waited just long enough for the third one so I could get a picture.  It was beginning to get dark and my camera couldn't focus too well so my pictures aren't the greatest.  I set my f-stop all the way down and hoped for the best.  Kind of looks like there may have been an issue focusing with the lack of light.


I've been wanting to have a bonfire, but have been holding off because I didn't want to set the field on fire!  Our bonfire pit is at the back of our yard and it's pretty close to the field.  Hopefully the weather will hold out for us so we can have that fire.  Tonight is supposed to be dry and 38° so keep your fingers crossed!


Don't you just love sitting around a fire?  We don't have a fireplace (gasp!), but we do have a nice-sized bonfire pit!  Hey, it works for me.  I don't know about you, but we could sit around a fire all night just staring at it and exchanging small talk.  I sometimes wonder why we humans have such a fascination with fire.  And as long as I'm thinking about it...I should add water to that primal fascination list.  Wouldn't it just be so perfect to have a hot tub with a fireplace nearby?  I'd be so happy in absolute heaven!

Friday, November 27, 2009

Let the Baking Begin!

What a surprise we had yesterday morning!  We woke up to find that it had s-n-o-w-e-d.  Less than an inch, but it was snow.  Thank goodness it didn't stick!  I know it's November, and it's the right time of year the for that.  I'm just never quite ready for winter and the inevitable snow and f-f-f-reezing temps that come along with it.


One of the things that I do love about this time of year is that it's baking season for me.  I tend not to bake nearly as much when it's hot in the summer  But when the temps cool off, I'm always ready to bake just about anything, especially for our family gatherings.  Besides, is there anybody who doesn't like their home smelling like a bakery?  My son came in the house the other day and wanted to know what I was baking.  When he thinks he smells something baking, in true "guy tradition," he's always ready to be first in line!  My oven was off and I wasn't baking a thing.  I had a candle burning, and it sure smells good!  It was one of Paula Deen's Cinnamon Pecan Swirl candles, and boy does it smell like the real thing.  If you haven't tried this one yet, I heartily recommend it.  Oh, and don't worry, my son didn't go empty-handed for very long.  I did bake up some cookies!


One of my brothers has a really big cookie fetish.  From as far back as I can remember I've called him Cookie Monster.  He joined us yesterday for Thanksgiving, so of course I baked a batch of cookies just for him.  Enough to fill a tin so he could bring them home.  This time I made Shortbread Cookies with giant Ghirardelli kisses.


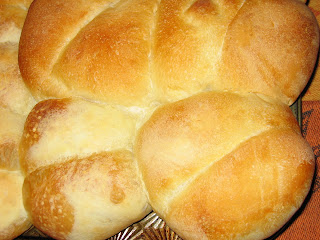
I was so busy yesterday with all of the preparations, baking and cooking!  I was so busy in fact, that I didn't think to grab my camera so I barely have any pictures of the food at all.  I did manage to take a quick shot of one of the pans of dinner rolls I baked.  They've kind of developed their own reputation, and are pretty popular around here.  And they're big.  Really big.  You could use one of these babies for a hamburger bun.  The pan in this picture is a vintage one that used to belong to one of my neighbors when I was a kid.  She always kept an immaculate yard and garden, even into her late 80's.  And she did all of that work by herself (including the mowing!).  Oh, her flower beds were so amazing!  When she passed away her daughters held a sale, and I bought her muffin pans.  She used to make the most delicious muffins, and she'd share them with us too!


I hope everyone had a wonderful, blessed Thanksgiving.

Now.....let's all enter the "100 Ways to Be Creative with Leftover Turkey" zone!!


Tuesday, November 17, 2009

A Beautiful Painting...Courtesy of The Heavens

Isn't it nice to take a little time and enjoy the beauty that surrounds us...


And just when you think it can't get any prettier...this happens...


I tend to stare, in awe, when I see sunsets.  And when the clouds are just right it's worth it.


And finally...


I didn't use any filters, these colors were 100% natural.  They were all taken earlier in the year at the edge of my yard, next to the field (you may have noticed the soy beans!)  The field isn't mine, but it was one of the deciding factors when we bought this house years ago.  Kind of helps me remember my roots.


Hope you enjoyed this heavenly little spot of brightness!

Monday, November 9, 2009

A Green Garden Concept

I have a great way for us gardeners to recycle something that may otherwise end up in a landfill.  It's also just one more way that I cut costs (which is a good thing!).  I heard about this years ago, and I forget where it was now.  If I somehow remember where it was, I'll give proper credit.

As a side note: if you have kids, this is a good project that they will enjoy helping with.


I don't know about you, but every year I start quite a few seeds inside to get a jump on the season.  I'm in Zone 5A so my plants need a little head start!  I don't have a greenhouse (not yet!!).  Instead of purchasing dozens of those little peat pots, why not use empty toilet paper tubes instead?  They biodegrade, and will enhance your soil.  Another bonus: you've already got them in your house, so no purchases need to be made.  Free stuff is good!!!


Paper towel tubes are also excellent, as they are almost exactly the same diameter.  Each paper towel tube will yield 3 pots.  You can also be creative and use empty cardboard tubes from gift wrap.  Some of the gift wrap tubes (especially from Christmas paper) can be quite wide and are helpful for planting more than one seed, such as squash, pumpkins, melons, etc.


Why am I talking about this now?  It's November, and many of the people in this country aren't even planting any gardens now!  What am I thinking?!?  Well, if you start saving your empty paper tubes now, you'll have plenty saved up by spring to get your garden off to a great start!  So start saving! 


Here's how I make my little homemade paper pots: 

For toilet paper and paper towel tubes:  Make cuts (one inch long) into one end of the tube.  Space these cuts about a half inch apart.  Continue doing this until you've gone all the way around one end of the tube.


Next, simply fold these "tabs" inward to form the bottom for your paper pot.


For wider tubes:  Make the cuts long enough so the tabs will span two thirds of the way across the open end of the tube when you fold them over.  You should space your cuts a bit farther apart for these bigger tubes, too.  Then fold the "tabs" in the same manner as for the smaller tubes.


Next, fill your new paper pots approximately 80 - 90% full with your favorite potting soil, and pack it slightly to eliminate any air pockets.  Then plant your seeds.  Oh, I should mention that if you live in a cold climate, and your potting soil is kept in the garage or outside, you will need to make sure your potting soil is at room temperature before planting to allow for good seed germination.  Overnight usually allows enough time for the soil to warm up.  Once your soil is in, and your seeds have been planted and watered, the pots tend to hold their shape well.  You can write the plant ID right on the paper pots so you can keep track of what's what until planting time.


To keep it all together and waterproof, I use plastic seed starter trays (that I've had for years).  The variety I use have black bases and clear plastic lids.  I've seen many of the big box home centers carry these.  The brand I use comes in 2 different sizes (1 1/4" and 1 3/4" peat pots).  I use the larger one.  Minus the peat pots of course.


The real beauty is that toilet paper and paper towel tubes are perfectly sized to fit into the little indentations in bottom of the 1 3/4" trays.  I just love it when things work out this nicely!  The jumbo-sized paper pots (e.g. Christmas wrapping paper type I mentioned) work better in the lid, but you'll need to take measures so they don't tip over because the lid doesn't have any perfect-sized indentations like the base has.


When removing your paper pots from the tray, you'll probably need to slightly twist them to safely lift from the tray.  Sometimes little roots will grow out of the opening at the bottom and they may intertwine.  There are no special steps are needed when transferring your plants to your garden.

PS. This idea works very nicely even if you do have a greenhouse.

~~Diana

Tuesday, November 3, 2009

Halloween Cactus?

I have a little Christmas Cactus that is entirely confused.  Now I think they're called Christmas Cactus because they tend to bloom at Christmastime.  But not mine, nosiree.  It blooms at Halloween.  And I have no idea what's up with that!

Here's the condensed version of how this little cactus came to live with me.  It was given to me by one of my students during the very last class I taught.  I had been teaching for many years when my DH decided that it was time for him to move on.  I was also attending college classes during the day, which I immediately needed to drop out of.  I took a day job instead, in addition to my night classes, and I continued teaching for about a year after our divorce was finalized.  I taught 3 classes per night, 3 nights a week (of course in addition to working more than 40 hours a week!).  My son would come along with me at night, and my classes started around 6pm, and wouldn't end until around 10pm, so it was hard for him to work on his homework while there.  Not to mention, it wasn't exactly my idea of spending "quality time" with him.  Of course I always wanted to be available for him with homework questions, and just to hang out.  So...after much thought, I made the decision to go into an early retirement of sorts.  At this point I had been an instructor for 15years, and I really liked it!  Besides, I thought I could always teach classes any time I wanted to in the future.  I really loved it.  Everything about it.  I met the most interesting people, and I made a wonderful friendship that I still have to this very day.

Annnnnyway...

At the very end of my very last class (November 1997!!!), one of my students and her little girl presented me with a tissue-wrapped object.  When I opened it, it turned out to be a cute little Christmas Cactus!  How sweet!  It wasn't blooming, and the only plant stake it had said that it was a Christmas Cactus and that it had been grown in Canada.  I really had no idea what color the blooms would be, but I couldn't wait to find out.  My dear grandmother had an absolutely gorgeous Christmas Cactus that bloomed hundreds of bright red blooms every Christmas.  I knew how she cared for it, and I thought my odds would be pretty good that I could have beautiful blooms too.


I read up on Christmas Cactus's, and followed all of the advice, but I never seemed to have much luck in getting it to bloom.  Nonetheless I kept trying.  It did have an incident once when a well-intentioned neighbor was house-sitting for me.  Half of the cactus got broken off, but it was a tough little guy and pulled through.  Eventually, that half filled in pretty nicely, but still no blooms.  I moved it to different parts of my home with darker and cooler rooms for periods of time.  Still nothing.

A couple of years ago, I bought a small bakers rack and set it up on my front porch.  I have always admired porches that had one.  I'm on the lookout for a full-sized bakers rack so I can have two and get my porch looking more the way I'd like it to.  I decided to put my Christmas Cactus right out there on the porch, and I also bought several different varieties of cactus to keep it company.  But that's another story for another day!  At the end of the season, I brought them all back inside and set it up in the living room below a southern exposure window.

Well.

I was certainly shocked to find my Christmas Cactus filled with all of these tiny little whitish nubs.  At first I thought it may have insect casings or something.  But those little nubs looked much different in a just one day.  Could I have buds forming?!  I'd better keep my eye on this.  They grew very quickly, and in a matter of days, they began to pop open!!  So that's what my cactus was wanting these past 10 years!!  Oh what a glorious sight!  You would have thought I won a lottery or something.  They are creamy-pinkish-ivory, with fuchsia stamens.  No idea what variety this Christmas Cactus is, but I adore the exotic-looking blooms, and how fragile they look.  If you happen to know, please send me a note!


This is the second year that it's bloomed, and there are even more this year than there were last year!  Oh, I hope next year it will produce even more!