skip to main |
skip to sidebar
Call it crafting, re-purposing, recycling...call it whatever you like. I like to think I'm kinda crafty, and I sometimes have these big streaks of creativity. Sometimes, my ideas work out pretty good, and that's ok with me. Sometimes they don't, and that's ok too. I don't know what it takes to flip on my "crafty" switch (I really wish I did though!).
Several years ago, one of my crafty friends had been hanging on to wine and champagne corks, thinking that one day she'd find a use for them. Well, I guess she never did, and eventually she asked me if I'd like to have them for a project with my preschool students, so of course they came home with me! It wasn't long before my students and I created several crafts with them. But I still had quite a few corks left over. I started out with...are you ready for this...a half-filled brown paper grocery bag, so there were a lot! Now hold on a minute.....I know what you're thinking...they weren't all from her house. Most of them came from the church. And they came in all shapes and sizes. Perfect!
A few years later, I started to think about all of those wine corks. What could I use them for? Then one day...it came to me! I thought I'd try to make little ornaments with them. So I got out my paints and crafty supplies, and what follows are my results. I made dozens of each, and sold them at craft fairs. My crafty friend and I used to go in together on booths. All of my ornaments had their own personalities because it was impossible to make them exactly identical! Some of my Frosty's had little stranded wire arms that I bent into "twig" shapes and spray painted dark brown. Some of my Santa's had bigger beards than others for a little variety. But I had to hang on to these two guys though...they were the first two I ever made.
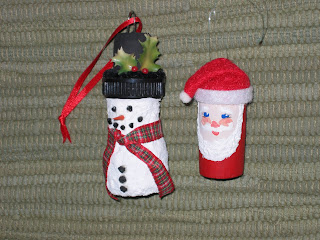


My little Santa was made from a standard wine cork. First, I painted his suit red. Then I added Snow-Tex for his beard, and painted his face with twinkling blue eyes. Well, they're about as twinkling as I could make them! I used scraps of felt for his hat, and added a tiny pom-pom to embellish it. For the hanger, I cut a paper clip in half, dabbed a bit of glue on it, and pressed it into the top of his hat.
Frosty was made using a champagne cork for his body, and a wine cork that had a plastic "rim" for his hat. (I don't know what kind of wine comes with this cork/plastic top...if you do, please, please tell me!) I painted his hat black, turned it upside down and glued it to the champagne cork. Then I applied a nice coat of Snow-Tex to his entire body. I added the black buttons, eyes, smile, and his carrot nose with a bit of glue. To make his nose I used the clipped end of a round toothpick that I had painted orange. The hardest part was waiting for the Snow-Tex to dry. I tied a narrow tartan ribbon around his neck for a scarf, and added a black pipe cleaner with a tiny sprig of plastic holly to the brim of his hat. The little black bits that look like coal are actually plastic aquarium gravel. I used the cut paper clip for Frosty's hanger, and added a tiny little red satin ribbon to hang him with.
It's just weird how I stumbled upon that idea to use the aquarium gravel! I happened to make a stop at the local pet shop for dog food while I was in the middle of this project. It's my habit to always look at all of the animals whenever I'm there (I can't help myself!). When I got to the fish dept. I noticed the gravel in their tanks...and I had a brainstorm! (cue the big streak of creativity!) It looked as if it would be absolutely perfect for Frosty! They didn't actually sell this gravel there, but the guy at the counter was happy to scoop out a bunch from one of their tanks for me. He asked me what I needed it for. So I told him. He was quite amused! So was Frosty. It worked out perfectly. And don't worry, the gravel received a good scrubbing before I used it!!
I've been seeing the beautiful ornaments that so many of you have been creating, and I just had to contribute. And I barely made it! I've been so busy and ohmigosh time is quickly running out for any last minute preparations! But I have written up all of my Christmas cards, embossed the envelopes, and sent them out last week.
Christmas is now just around the corner - - someone please tell me how this happened?!?!
~~Diana
I have a great way for us gardeners to recycle something that may otherwise end up in a landfill. It's also just one more way that I cut costs (which is a good thing!). I heard about this years ago, and I forget where it was now. If I somehow remember where it was, I'll give proper credit.
As a side note: if you have kids, this is a good project that they will enjoy helping with.
I don't know about you, but every year I start quite a few seeds inside to get a jump on the season. I'm in Zone 5A so my plants need a little head start! I don't have a greenhouse (not yet!!). Instead of purchasing dozens of those little peat pots, why not use empty toilet paper tubes instead? They biodegrade, and will enhance your soil. Another bonus: you've already got them in your house, so no purchases need to be made. Free stuff is good!!!
Paper towel tubes are also excellent, as they are almost exactly the same diameter. Each paper towel tube will yield 3 pots. You can also be creative and use empty cardboard tubes from gift wrap. Some of the gift wrap tubes (especially from Christmas paper) can be quite wide and are helpful for planting more than one seed, such as squash, pumpkins, melons, etc.
Why am I talking about this now? It's November, and many of the people in this country aren't even planting any gardens now! What am I thinking?!? Well, if you start saving your empty paper tubes now, you'll have plenty saved up by spring to get your garden off to a great start! So start saving!
Here's how I make my little homemade paper pots:
For toilet paper and paper towel tubes: Make cuts (one inch long) into one end of the tube. Space these cuts about a half inch apart. Continue doing this until you've gone all the way around one end of the tube.
Next, simply fold these "tabs" inward to form the bottom for your paper pot.
For wider tubes: Make the cuts long enough so the tabs will span two thirds of the way across the open end of the tube when you fold them over. You should space your cuts a bit farther apart for these bigger tubes, too. Then fold the "tabs" in the same manner as for the smaller tubes.
Next, fill your new paper pots approximately 80 - 90% full with your favorite potting soil, and pack it slightly to eliminate any air pockets. Then plant your seeds. Oh, I should mention that if you live in a cold climate, and your potting soil is kept in the garage or outside, you will need to make sure your potting soil is at room temperature before planting to allow for good seed germination. Overnight usually allows enough time for the soil to warm up. Once your soil is in, and your seeds have been planted and watered, the pots tend to hold their shape well. You can write the plant ID right on the paper pots so you can keep track of what's what until planting time.
To keep it all together and waterproof, I use plastic seed starter trays (that I've had for years). The variety I use have black bases and clear plastic lids. I've seen many of the big box home centers carry these. The brand I use comes in 2 different sizes (1 1/4" and 1 3/4" peat pots). I use the larger one. Minus the peat pots of course.
The real beauty is that toilet paper and paper towel tubes are perfectly sized to fit into the little indentations in bottom of the 1 3/4" trays. I just love it when things work out this nicely! The jumbo-sized paper pots (e.g. Christmas wrapping paper type I mentioned) work better in the lid, but you'll need to take measures so they don't tip over because the lid doesn't have any perfect-sized indentations like the base has.
When removing your paper pots from the tray, you'll probably need to slightly twist them to safely lift from the tray. Sometimes little roots will grow out of the opening at the bottom and they may intertwine. There are no special steps are needed when transferring your plants to your garden.
PS. This idea works very nicely even if you do have a greenhouse.
~~Diana
Every year my community holds a Halloween Party in our Community Building. It's great fun for kids of all ages. There are prizes for kids costumes, and a Halloween Treat Decorating contest. I always wanted to enter something in the Treat Decorating Contest, but inevitably something always came up, or I got busy, or I just never got around to it. Well last year was my year.
I baked up a batch of sweet little Kitty Cat Cookies, and whipped up a Witch's Brew Punch. Instead of serving it in a plain old punch bowl and cups, I used a pumpkin and mini pumpkin gourds. I carved out a pumpkin and put my brew in it! I was going for best decorated here, and I really wanted to win! I also carved out a few mini pumpkin gourds and painted "blood" drooling from the top where I cut the tops off. I completed the look with spooky black gauze, some festive fall leaves, spiders, bats, and a snake (all fake of course!). But the one thing that I thought would really put me over the top, and hopefully sway the judges, was the dry ice I added to my Brew! I would have added a bright red glow-stick as well (for an eerie red glow!) , but I knew the lighting at the party would be too bright for it to be effective. Anyway, I was just sure my creativity would give me the win! Ha!!!
Well...as it turns out, I did win. It was a win by default. You see, I won because I was the only entrant in the contest!!! Who would've guessed?! A little competition would have made it more satisfying, but none the less it counts as a win in my book. ;)
Here's my first place win in the 2008 Halloween Treat Decorating Contest...
Witch's Brew:
1 32oz Fruit Juicy Hawaiian Punch
1 2-liter 7-up
1 pint of sherbet - your choice of flavor
1 fairly large pumpkin (the round kind - not the tall variety)
It's nothing fancy, just your basic traditional party punch; just combine everything in your pumpkin and very carefully add some dry ice. Yes! The punch is perfectly safe to drink even though there is dry ice in it...as long as the dry ice stays in the pumpkin. When dry ice melts, it produces a gas (the steam). It is not safe to allow dry ice to touch any part of your body, especially your mouth!! Just keep it in the pumpkin and enjoy the swirls of steam in there. Adult supervision is definitely needed if little ones are around. Just to be sure nobody got hurt, I stayed with my display for the duration of the event.
Kitty Cat Cookies:
1 bag of skinny pretzel sticks
1 bag of mini M&Ms
1 bag walnut halves
Make your favorite full batch of chocolate chip cookies.
Immediately after removing the cookies from the oven, decorate each cookie with 4 skinny pretzel sticks for whiskers, 2 walnut halves for ears, a red mini M&M nose, and 2 green mini M&M eyes. These cookies won't stack well at all, but the cute factor makes it worth while!
I cut out pumpkins from waxed paper to place the Kitty Cat Cookies on. I didn't think they'd be too appetizing just sitting there on that gauzy fabric! The guests were so polite, everybody made sure that it was ok before they took a cookie! Well, of course it was ok! And once it was clear that it was ok, the Kitty Cat Cookies did a major disappearing act! I think I only brought a couple home (I held them back so my guys could have a couple later). I originally started out with a batch of 60 or so.
My pumpkin gourd cups were just for looks. In order to actually use them, the insides of the gourds would have needed a coating of paraffin just to be safe. I served up the punch in good old fashioned solo cups (orange of course!). The pumpkin punch bowl was not coated, but I did scrape out every piece of string, goo and seed. I rinsed it several times to make sure nobody had a "chunky" Brew!
The kids were so cute! There were so many adorable costumes (most of them were home made), I don't know how the judges made any decisions. The Association had a photographer set up in a corner with bales of straw and pumpkins. The grand prize Kids Costume Contest winner was a little guy who was made up to be a fireman. He was walking around with a firetruck made from a cardboard box that night (steering wheel, bell and all!). His cardboard firetruck was held up by suspenders over his shoulders. It was really well designed, and he was so shy and cute! Everybody had a good time, went home with candy, and had their bellies filled with Halloween goodies.
Have a very safe and Happy Halloween!
~~Diana
It's that time of year when I'm harvesting tons of food from my veggie garden. Every year we end up with an absolute flock (swarm?) of fruit flies too! Now I'm sure they only want to get in on some of the good stuff while they can. They also seem to have a high level of fascination with the human eye! What's up with that?! So when our indoor fruit fly population gets to be too high I set a little trap for them. We tend to have quite a bit of fruit and veggies around all year, so the fruit flies are inevitable!
This trapping method is the best thing! I won't use pesticides inside my house, so this is the perfect way to control them without resorting to chemicals. Best of all, the items you need are already in your house!
Here's what you need:
1 glass (clear is best so you can keep an eye on everything)
1 sandwich baggie (or a small piece of plastic wrap)
1 rubber band
1 toothpick
approximately 1 - 2 inches of fresh fruit in your glass (pineapple is the best, but most any other fruit will work well too)
You'll add the fruit to your glass, and then cover the top with the plastic. Stretch the plastic to fit tight like a drum, and use the rubber band to keep it in place. Poke little holes with the toothpick all around the top of the plastic. Make sure you keep the plastic tightly stretched after you're done poking the holes. Those little buggers can go in, but aren't clever enough to actually figure out how to get out!
Just set your trap someplace in your house where you tend to see fruit flies. Don't worry, they'll find it! When you have several trapped, you can return them to the wild, or dispose of them in whatever way you see fit. You can easily re-set the plastic on top of your glass. In a few days, you won't have any of those pesty little fruit flies left! Works every time!
~~Diana
I recently made a batch of home made laundry soap, and I just looove the way it smells. It's very evocative of citronella. A really fresh scent. The last time I made it, my neighbor joined me and we went "halves" on everything, including the whole manufacturing process. Her daughter came along and helped with the grating (and let me tell you, that's a real help!). I didn't think to take any pictures during all of this, but I did take one of the finished product.
It's crazy-easy to make, your laundry smells so fresh (without all of the heavy perfumes), and best of all it's really inexpensive. It's the perfect thing to use if you have a front-loading machine because it's non-sudsing. And it's perfectly safe for septic systems.
The first time I made a batch (over 25 years ago, omigosh!), I really had no idea what to expect. It smelled good, and it looked like soap should, but I wasn't sure it would actually clean anything because it wasn't sudsing up in the washer. Well, I've come to learn that the suds aren't what actually cleans your laundry. I took a really good look at the water in the washer on that first load, and I couldn't believe my eyes! The water was so cloudy and tan in color that I couldn't tell that I even had any clothes in it! Now, you may be thinking that our clothes must have been really dirty. I would say just average, nothing too bad. Well, when I took everything out of the washer, it all looked very clean. I believe this soap removes all of the built up detergents, softeners and other things that built up over time. And the clothes smelled just so fresh! I've been sold since that day.
Here's my recipe:
POWDERED LAUNDRY SOAP
12 cups Borax * (20 Mule Team)
8 cups Baking Soda (any brand is just fine)
8 cups Washing Soda (I use Arm & Hammer)
8 cups Bar Soap - finely grated ** (measured before grating: 8 cups = 64 oz)
OPTIONAL: 8 cups Powdered Oxy type cleaner *** ($1 stores carry an off-brand that works just as well as the big name brand)
*You may adjust the Borax according to the hardness of your water. (ie, the harder your water, the more Borax you'll add).
**I use Zote (the pink one), because I really like the scent, but you may also use Fels Naptha or Ivory. Don't use any type of deodorant soap or your clothing (and washer) will end up with a terrible film.
***I started using this in occasional batches about 15 years ago to boost the soap when there are extra dirty clothes to wash. It's not a required ingredient for the soap recipe, just an option.
First, (and I cannot stress this enough!) slice the bar soap in 1/2" slices and allow to air dry for a day or two, you might want to occasionally turn the slices over during this time. It's a really moist soap and won't grate finely, it will want to clump instead. Once you think it's dry enough, place several sliced pieces of bar soap at a time in a food processor and finely grate until it's all grated. If it's grated too large, it will not dissolve well in your washer. Just for reference...your grated soap should be much finer than mine is in the picture!
Mix all ingredients in a sturdy bucket (I use a 5 gallon paint-stirring stick to mix). Make sure to get it thoroughly blended.
That's it. I use 2 tablespoons (or 1/8 cup if you'd rather measure with a cup) per load.
I wash everything in cold water, so I pre-melt my 2T of soap in 1 cup of water in a mason jar in my microwave. Especially with this last batch I have! LOL (you may have noticed the really large pieces of pink Zote in my picture?) Just be sure to keep your eye on your melting soap as the microwave tends to cause it to foam up, and from experience I can tell you that it will overflow rather quickly! I use a whisk to stir the soap during the melting process; it blends it better than a spoon.
I tend to keep a few batches pre-melted so I can just start doing laundry any time I want to. I store my pre-melted soap right in the mason jars. The melted soap may become semi-solid, but don't worry! Anybody who's ever had the pleasure of doing "science experiments" with their kids will know that Borax does some strange things! All you need to do is shake the jar for a few seconds and your soap will become a liquid again. You can always zap it for a few seconds in the microwave if you'd like.
I like to add the soap to the
water as the machine is filling, and allow it to completely fill before
adding my clothes...just to be sure it's dissolved in my hard water.
This batch will make quite a large amount. I store my Powdered Laundry Soap in a plastic tub that originally held 35 pounds of cat litter. It's heavy duty, has a lid and a metal bail, perfect for laundry soap!
PS. The overall cost for this last batch was 6¢ per load (1 load = 2 tablespoons)!
Have fun and let me know if you try this.
~~Diana